
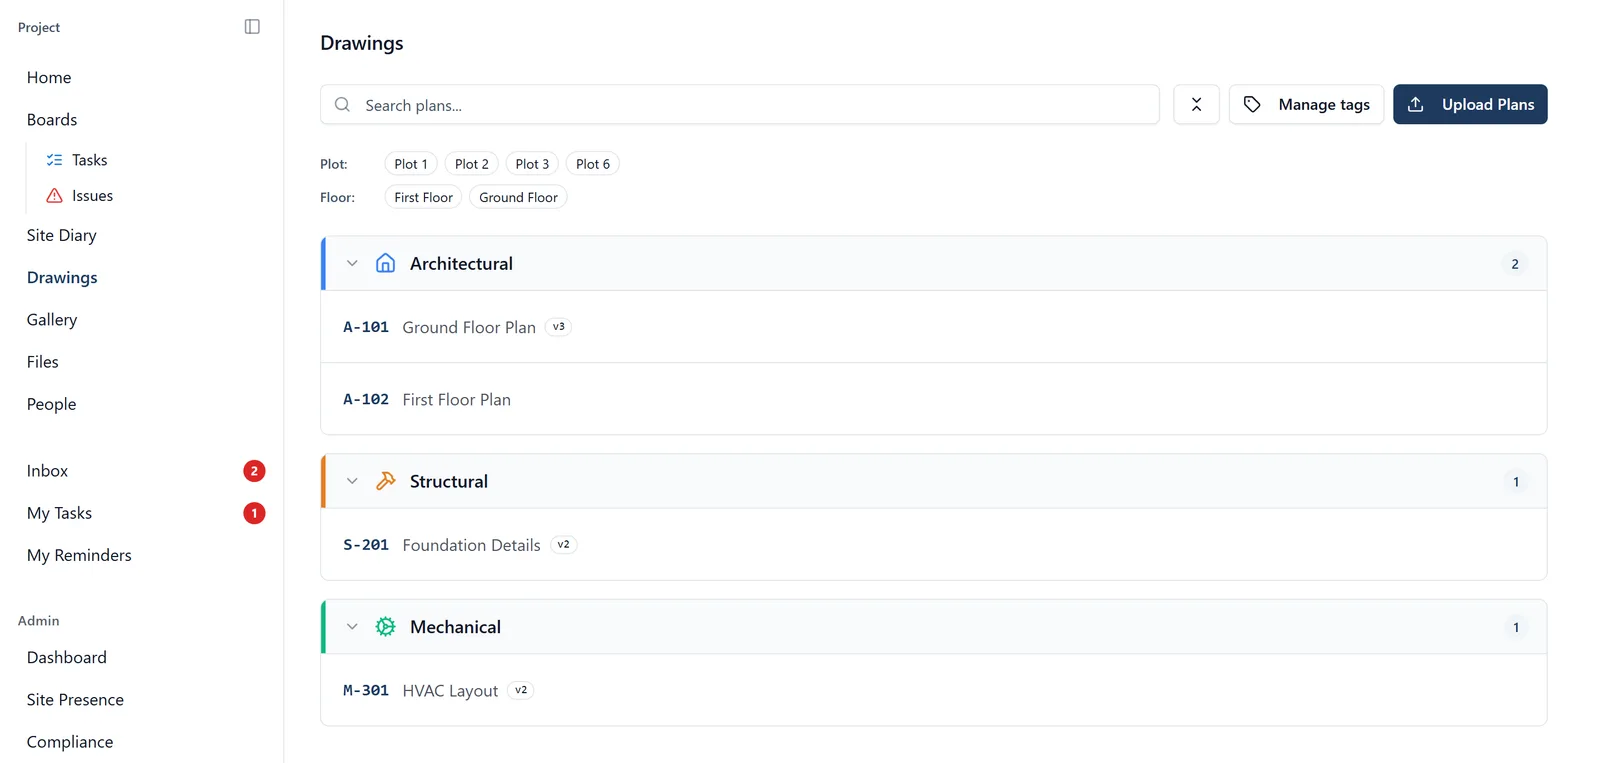
View and manage construction drawings for your project. A drawing can be a PDF or a photograph of a sheet (JPG or PNG), up to 50 MB.
How to get to Drawings:
- Tap the document icon in the bottom bar (second icon from the left, labelled “Drawings”)
Viewing a drawing:
- Tap the document icon in the bottom bar
- Drawings are grouped by discipline (e.g., Architectural, Structural, Mechanical)
- Tap a group heading to expand or collapse it
- Tap a drawing to open it
- Pinch to zoom in/out, swipe to move around the drawing
Adding a new drawing on the phone (admins only):
- Go to Drawings (tap the document icon in the bottom bar)
- Tap the round + button in the bottom-right corner
- Tap “Add Drawing”
- Fill in the details:
- Plan Number (required): e.g., “A-101”
- Title (required): e.g., “Ground Floor Plan”
- Discipline (required). Pick from the list: Architectural, Structural, Mechanical, Electrical, Plumbing, Civil, Landscape, Fire Protection, Interior, Other
- Plan File (optional): tap “Select PDF or image file”, then pick “Choose from Files” or “Choose from Gallery”. It can be a PDF or a photograph of the sheet (JPG or PNG), up to 50 MB
- Tap “Save” at the top
Sending a drawing to somebody from the phone: Press and hold the drawing and tap Share, or open it and tap Share in its menu (the three dots at the top). Your phone’s share sheet opens, and the drawing goes as a file named with its number and title, such as “A-101 Ground Floor Plan.pdf”. It is always the current revision, even if you were looking at an older one, and it goes without any markup drawn on it. Anybody who can see the drawing can share it.
Editing or deleting a drawing (admins only):
- Go to Drawings (document icon in the bottom bar)
- Press and hold on the drawing you want to change
- A menu appears at the bottom of the screen with options:
- “Edit Plan”: change the title, number, discipline, or replace the file. With a new file you can also say which Revision it is (what its title block prints, such as E or P2) and add optional Revision Notes describing what changed
- “Delete Plan”: remove the drawing from the project
- Tap the option you want
Specs and schedules revise too, separately. Everything in the Files area now carries versions of its own, worked the same way from a reader’s point of view: one row at the version that is live, a history beside it, and older issues marked superseded. Drawings keep the revision system described here, filed under a drawing number, and nothing about them changes. See the “file_versions” topic for the other one.
Revision history:
- When you replace a drawing’s file, the older version is kept automatically
- Open a drawing, tap the menu/options icon, and choose “Revision History” to see every previous version with its upload date and any revision notes
- This works on both mobile and web
What each revision is called:
- A revision carries the name its title block prints, such as Rev E, Rev P2 or Rev C1, everywhere the app shows it: the Drawings list, the revision history, the viewer, a task that has the drawing attached, the home page and SiteBot’s answers. A revision nobody named is shown by its number instead, v5
- When you upload, say which revision it is. In a browser the Rev box in Upload Plans is filled in for you when the filename carries it (“S-02 Rev E”, ”…-P05-…”, “A-101 C2”), and Edit Plan has a Revision box. On the phone, Add Plan and Edit Plan have a Revision box too
- Type it however you like: “rev e”, “Rev E” and “E” are all saved as Rev E
- If you leave it empty but your revision notes start with it, such as “P2: issued for construction” or “Rev E: beam resized”, that is used. Drawings added before revisions had names were given theirs the same way, where their notes said
- Admins can correct a revision’s name in a browser: open Revision History and click the badge (Rev E, or v5), type what the title block says, and press Enter. Leave it empty to go back to the number. Escape puts it back as it was
- The name never changes which revision is current: that is always the one uploaded last
Marking up a drawing:
- Draw on a drawing the way you would with a pen on a printed sheet: ring a detail, put an arrow on the opening you mean, box out an area, write “check this dimension” beside it. The same five tools as on a photo: freehand, arrow, rectangle, ellipse and text, in six colours
- In the browser, open the drawing. The pencil sits in the bottom-left corner of the viewer. Click it, pick a tool and draw straight onto the sheet. A shape saves as soon as you let go
- You can keep scrolling and zooming while the pen is in your hand: the mouse wheel moves down the sheet, and Ctrl and the wheel zooms, so you can work zoomed right into a detail. The pen stays the same size on your screen whatever the zoom, so a note drawn close in is fine on the sheet
- Undo, moving a shape you have just drawn, changing a label’s words, and removing a shape all work exactly as they do on a photo. See the “photo_annotations” topic
- The eye icon in the viewer’s toolbar hides and shows the markup, and says how many shapes there are. It only appears on a sheet somebody has drawn on
- On the phone, open the drawing and tap the pen icon at the top. The page you were on opens on its own, fitted to the screen, with its markup on it. Draw as you would on a photo, step between pages with the arrows at the bottom, and tap Done to go back to scrolling. While the sheet is scrolling, a small 3 markup shapes label at the top says it has been drawn on, and tapping it opens the same view. Pinch to zoom is not available while you mark up
- Any PDF in Files can be marked up in the same way, in the browser. Its Discussion tab counts the shapes and names the pages they are on, and each line of its history says which page somebody drew on, such as “drew 3 shapes on page 2”. Click it and the sheet goes to that page and lights them up
Markup stays on the revision it was drawn on:
- Markup belongs to the issue of the sheet it was drawn on. When a drawing is revised, the new revision starts clean, and the old one keeps everything drawn on it, so “the engineer circled this on v2” stays true after v3 arrives. Nothing is copied forward, because a circle round a wall that has since moved would mean nothing on the new sheet
- When an earlier issue carries markup, the current sheet says so in a line under its toolbar, such as “v2 of this drawing has 4 markup shapes”, with a button to open that issue. Revision History also counts the markup on each issue
- An earlier issue shows its markup but takes no more. Anything drawn on an old issue would be seen by nobody working from the current one
- If a note still matters on the new sheet, draw it again there, as you would with a pen
Adding drawings on the web app (admins only):
- Click “Upload Plans” at the top of the Drawings page. It is the only way to add drawings on the web app, and it takes many files at once
- Drop the files in, or click the box to browse for them. PDFs, or photographs of sheets (JPG or PNG), up to 50 MB each
- The app reads the drawing number, the title and the discipline out of each filename and fills the rows in, so you check them rather than type them
- The Rev column is the revision each file is, filled in from the filename where it says (see “What each revision is called” above). Check it, or type it
- If a number is already in the project, it offers to file that file as a new revision of the drawing you already have, with a box for revision notes. Untick that if it really is a new drawing, and change the number
- If two files in the same batch share a number, the first becomes the drawing and the rest are filed as its revisions
- If a file is exactly the same as one already filed under that drawing number, it tells you before you upload it again
- If a filename names a plot that matches one of the project’s drawing tags, that tag is ticked for you
- Notify team is ticked, so the upload is announced as one notification however many files it holds. Untick it to tell nobody. Under Who to tell, leave Everyone on the project, or choose Only the people I choose and tick the trades the drawings matter to: only they get the notification, and only they (and you) can see it
- The button at the bottom says what it is about to do, for example “Add 12 Plans + 3 Revisions”. Click it
A revision uploaded from Edit Plan in a browser has the same Notify team tick and Who to tell choice, which appear once you attach the new file. Drawings added from the phone are always announced to everyone.
Reading the Drawings list in the browser:
- Drawings sit under a heading for each discipline, with a count on the right. Click a heading to fold it away. The double-arrow button at the top right of the page folds or unfolds every heading at once
- Each drawing carries a small badge beside its title naming its current revision, such as Rev C1, so you can see which issue is live without opening anything. A drawing whose revisions have no names shows v2 (or v3, v4) once it has been revised
- Rest your mouse on a row and buttons appear on the right. Revision history and Open in new tab (the sheet itself, in a fresh browser tab) are there on any drawing that has a file. Admins also get a pencil to edit the drawing and a bin to delete it
- Click a row to open the drawing on its own page. The drawing number is a proper link, so you can right-click it and copy the address to send somebody straight to that sheet
- All of that is mouse work. On the phone you press and hold a drawing instead, as described above
Searching inside the drawings themselves:
- Type at least two characters into the search box, then tap or click “Search inside plans”. This works on the phone as well as the web app
- It looks for your words in the text on the sheets, not just in the numbers and titles, and it shows you a short piece of the text it found them in so you can tell which sheet to open
- It matches words, so search for what would be written on the drawing (“foundation detail”) rather than asking it a question
What BuildersAI reads off a drawing:
- A drawing you upload is read as soon as it lands, the same way a document in Files is. The title block, the general notes, the callouts and any schedule printed on the sheet all go in
- Anything definite it finds becomes a specification, and an admin reviews it on the Specifications screen. A manhole schedule on a drainage sheet becomes one entry per manhole, with its cover level and depth
- Each one records the sheet it came off, so opening its source jumps straight to that page rather than the front of the set
- That is also what makes “Search inside plans” work, and what lets you ask SiteBot about something written on a sheet
- PDFs and photographs of sheets are read. An IFC model or a DWG is stored and shared as normal, but nothing is read out of it, so issue the drawing as a PDF as well if you want the specifications off it
Drawing tags: getting from 40 sheets down to the 6 for plot 12: As well as a discipline, a drawing can carry tags. Tags sit in groups an admin has set up for the project, usually something like Plot, Floor, Phase or Zone.
Filtering by tags in the browser:
- Open Drawings. Above the list there is a row of chips for each tag group, with the group’s name in front of it
- Click a chip to switch that tag on, and click it again to switch it off
- Two chips in the same group widen the list: Plot 12 or Plot 14
- Chips in different groups narrow it: Plot 12 and Ground Floor
- Clear filters, underneath the chips, puts everything back
Filtering by tags on the phone:
- Open Drawings and tap the funnel icon at the top right. It is only there once the project has tag groups
- Tick the tags you want and tap Done. The funnel then carries a small number for how many you have ticked
- The tags you picked sit in a strip under the header. Tap one to take it off, or tap Clear all at the end of the strip to drop the lot
- Groups combine exactly as they do in the browser: any of the tags you picked within one group, and every group you picked from
Setting up tag groups and tags (admins, web app only):
- Open Project Settings and go to Tags (the card is titled Tag groups)
- Type a group name into the box at the bottom, for example Plot, Floor or Phase, and click Add group
- Type a tag into that group’s own box, for example Plot 1, and click the + beside it
- To rename a tag, double-click it and type. To remove one, hover over it and click the small x
- Deleting a group deletes its tags and takes them off every drawing they were on
Putting tags on a drawing (admins, web app only):
- When you upload: tick the tags for each row in the Upload Plans dialog
- Afterwards: hover the drawing’s row, click the pencil, and pick the tags in Edit plan
- The phone can filter by tags but cannot create or change them, so this part is done at a computer
Handing a plot over:
- Handover pack on the Drawings page gathers everything the project holds for one plot into a ZIP. It appears once the project has a tag group called Plot. See the “handover_pack” topic
More on the web app:
- See the “web_app” topic for more
Offline access:
- Once you’ve opened a drawing, it’s saved on your phone
- You can view it again without internet
Who has opened which sheet:
- Opening a drawing is recorded against the revision you opened, so the project knows which sheets the team is actually working from. Saving one for offline, downloading it, or opening it in a new tab is recorded too
- It works on the phone with no signal: the record waits on the device and goes up when a connection comes back, carrying the time you actually opened it
- It records that you opened the sheet, and nothing more. It is not a declaration that you have read or understood it
- Admins read it on the Drawing Awareness panel of the Dashboard (browser only, see the “project_dashboard” topic), which shows how many of the people who can see each drawing have opened the issue in force, and names up to three who have not. A drawing that has been reissued and that most of the team has not opened is flagged there as a rework risk
- Only a project’s admins see the whole picture. Everybody else sees their own reading and nobody else’s
A drawing on a task knows when it has been reissued:
- In a browser, a task’s Files section has Attach a drawing, which puts the drawing’s current issue on the task. Attach it that way rather than downloading the PDF and uploading it again: a re-uploaded copy is a separate file that nothing links back to the drawing
- When the drawing is reissued, the task says so: the attachment carries an amber badge naming the issue it has, such as Rev D (or v1), and a line such as “Rev E is the current one”, and Open it brings you here, to the current issue. On the phone the tile carries the same badge. See the “working_on_a_task” topic
Who can do what:
- Everyone can view drawings, search inside them, and filter the list by tags, on the phone and in the browser
- Only admins can add, edit, or delete drawings
- Only admins can set up tag groups and tags, or put a tag on a drawing, and that part is web app only
- Admins and members can mark up a drawing. Everybody who can see the drawing sees its markup, followers included. You can remove a shape you drew, and an admin can remove anybody’s. If the project’s subscription has lapsed, nothing new can be drawn