
A photograph on its own is a picture. What people write and draw on it is what turns it into a record. This topic covers a photo’s title and description, drawing on it, numbered points of interest, the discussion beside it, how it was added, and evidence packs. Taking photographs, finding them and opening one are in the “photos” topic, and albums are in the “photo_albums” topic.
Giving a photo a title and a description:
- Every photo can carry a title and a longer description, both written by a person. They are separate from the AI description, which the app writes for itself and which sits under its own heading in the photo’s info
- In the browser, open the photo. The title runs along the top of the viewer: hover over it, click the small pencil beside it, type, then press Enter. The description is the bordered box directly under the picture, with its own pencil in the top-right corner when you hover. It takes bold, italics, bulleted lists and links
- On the phone, open the photo, tap the strip under it to open Photo Info, then tap the pencil beside Details. Title and description are edited together there
- Both are recorded against your name, and the change shows in the photo’s history as “edited the title and description”. Write them the way you would write into the record. A title is what turns “IMG_4471” into “Cracked lintel, Plot 4”
- Or just ask me: “Title that one ‘Cracked lintel, Plot 4’ and note that it is above the back door”. I can read a photo’s title and description back to you as well
Drawing on a photo:
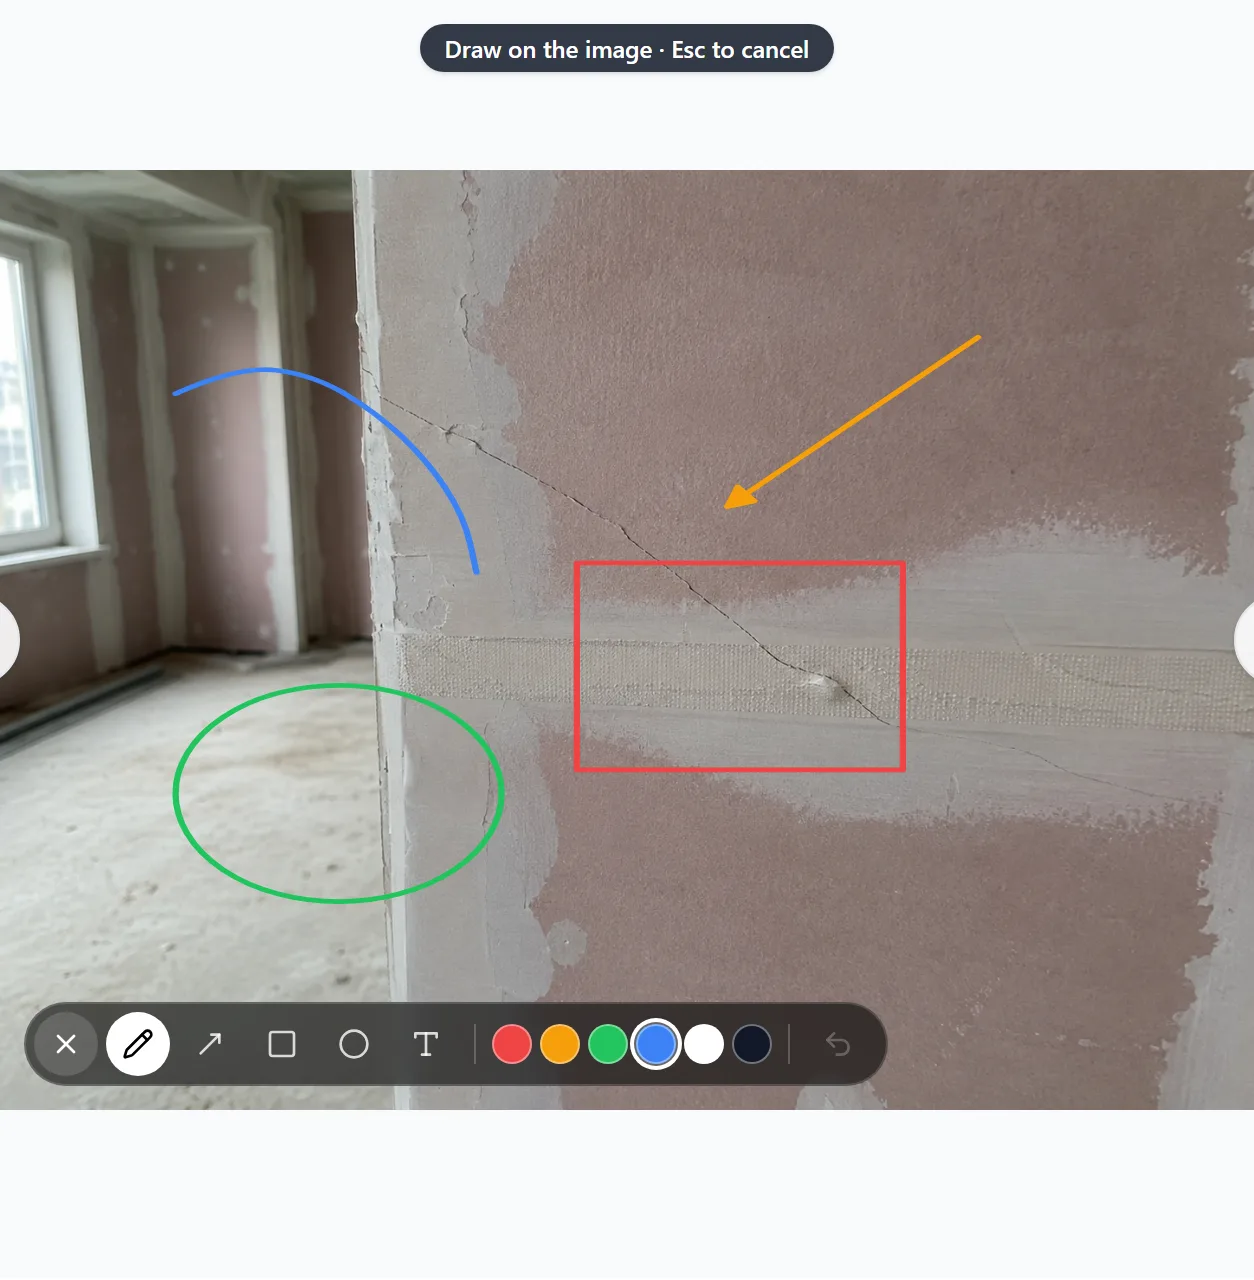
- On the phone and in the browser. Ring a defect, put an arrow on the pipe you mean, box out a run of snags, write “re-tape this joint” on the joint
- Open the photo. The pencil sits in the bottom-left corner of the picture itself. Click or tap it and the tools open in place: freehand, arrow, rectangle, ellipse, text, and a row of six colours
- Draw straight onto the photo. A shape saves as soon as you let go. There is no Save button
- The text tool is the one that works differently, because words have to be typed. Click or tap the spot where you want them, and they go in there. In the browser you type straight onto the photo and press Enter; on the phone a bar comes up above the keyboard and you tap Add. Escape, or Cancel, backs out. Keep it to a few words: a label holds one line, and there are 40 characters for it. Anything longer belongs in a point of interest or a comment
- The pen stays in your hand between shapes, so a run of snags is one pass. To put it down, press Escape in the browser, or click or tap the X that has taken the pencil’s place. The app remembers the pen and the colour you last used
- Until you put the pen down, what you drew can still be put right. Click or tap one of the shapes or labels you drew since you picked the pen up, then drag it to where it should be. A picked label also gets a T button beside the red bin, which changes its words. Only your own shapes from this sitting can be picked like this; in the browser, Escape lets go of one
- Once the pen is down, they are fixed like everything else on the photo, so the next person reads what you left. To change one after that, delete it and draw or write it again
- Undo only takes back what you did just now. While the pen is in your hand it takes back a move, or a change of words, before the shape itself. It will not remove a shape a colleague left last week. That is deliberate: removing somebody else’s work should be a decision, not a keystroke
- To remove one shape, put the pen down, click or tap the shape or the label, then use the red bin that appears just above it. You can remove your own, and an admin can remove anyone’s
- An admin can clear every shape off a photo at once. In the browser it is Clear all, on the line at the top of the photo’s Discussion tab that counts the shapes. On the phone it is the red bin at the top of the Points of interest screen. Comments and points of interest are left alone, and it cannot be undone
- Everything you draw in one sitting reads as one line in the photo’s history, such as “drew 3 shapes on this image”, with your name and the time. Click that line in the browser and it lights up exactly those shapes; on the phone, tap it and the sheet closes so you can see them light up on the photo itself
- Taking a copy of the photo away with the drawings on it, or without them, is in the “photos” topic
- Drawings (PDF sheets) take the same markup. How it works on a sheet, and what happens to it when a drawing is revised, is in the “plans” topic
Points of interest (numbered pins):
- On the phone and in the browser. A pin marks a spot on the photograph and carries what you wrote about it, so “the crack at number 2” means something to whoever opens it next
- In the browser, open the photo and click the map-pin icon in the top bar (you need a reasonably wide window for it to show), then click the spot on the picture. The box beside the photo becomes New point of interest: type what needs attention and click Add point
- On the phone, open the photo and tap the location pin in the top bar to open Points of interest. Tap the + button, tap the spot on the picture, write the note and tap Add point
- The note is optional. A bare pin is allowed when the picture says it all
- The pin is numbered on the image and carries the same number beside its words: in the browser in the Discussion tab, on the phone as a “Point of interest #2” line in the comments sheet
- In the browser, clicking a pin brings its words into view beside the photo, and every entry carries a Locate on image button pointing back the other way. On the phone, tap a pin on the Points of interest screen to read its card
- You can remove a pin you placed yourself
- The eye icon hides and shows everything drawn on the photo, pins and shapes together, so you can get a clean look at the wall. In the browser it is in the top bar of the viewer. On the phone it is at the top of the Points of interest screen. Hiding them changes nothing about what leaves the app
The discussion beside a photo:
- Every photo has its own conversation. In the browser it is the Discussion tab down the right-hand side of the viewer. On the phone, tap the speech bubble in the top bar and it opens as a sheet
- Type @ to bring a colleague in. In the browser you can also type # and pick a task, and clicking that reference later opens the task on top of the photo
- You can attach a photo or a video to a comment on either. In the browser you can attach any file
- The photo’s history sits above the conversation on both, oldest first: who uploaded it and when, who changed its title or description, and who drew on it. Each line names the person and the time
- Points of interest sit in this list too, under their numbers
How a photo was added:
- A photo taken with Take photo in the phone’s Gallery (the camera inside the app) carries a record of how it was taken, which the app sends separately and cannot change afterwards. Take photo itself is in the “photos” topic
- In the browser, open the photo and look under How it was added on its Info tab. It says Taken in the app, the account, the time, where the phone reported it was and which phone
- Beside the time it says whether the phone’s clock matches our server, which saw the photo between two times shown underneath. If the phone was offline it says the time is from the phone’s clock, and if the clock was wrong it says so
- A photo added from the phone’s photo library, Files or its own camera says that instead, and one shared in from another app such as WhatsApp says Shared from another app. A photo added in the browser, or before the app kept this record, shows nothing
- It is what the app reported, not proof of what is in the picture: it does not yet check that the app itself was unmodified, and it says so
Evidence pack (browser only):
- An evidence pack is one ZIP file you can hand to an insurer, a solicitor or a client. It holds the photographs plus a written record of when and where each one was taken
- Click Select above the photos, click the ones you want, then click Evidence pack
- It tells you the real number before it builds anything. That number can be smaller than what you picked, and the box says why: a photo above your own access level is left out, and so is an image attached to a task or a comment, because those have no capture record to report
- Inside the ZIP: a photos folder holding the pictures, each named by its date; manifest.csv, one row per photograph with the capture time, upload time, coordinates, GPS accuracy, distance from site, place, album, title, description, tags, the AI description, who uploaded it, its access level, how it was added and, for a photo taken in the app, the server’s time window and the phone, file size and a SHA-256 checksum; manifest.json, the same rows for a computer; and README.txt, which explains what the pack is
- Read the README before you rely on the pack. It says which locations the app recorded itself, which were read out of the photo’s own data, and which a person placed by hand, how many photos were taken in the app, and it says plainly that this is not a chain of custody: photographs are re-encoded on upload, so the files in the pack are the copies BuildersAI holds rather than the bytes that left the camera
- Also include date-stamped copies adds a second folder, date-stamped, holding a reading copy of each photograph with the date printed onto the image. The pictures in photos are untouched and are still the ones the checksums describe, and the README says so. It roughly doubles the size of the pack
- Up to 500 photographs and 2 GB in one pack. For a bigger job, narrow it down and produce a second pack
- For everything a project holds for one plot (its drawings, inspection records and documents as well as its photographs), produce a handover pack instead. See the “handover_pack” topic
- BuildersAI keeps a record of who produced each pack and when, including a checksum of the manifest, so a pack can be checked against that record later
- Admins and members only
Printing the date onto a photo (browser):
- For building control, an insurer or anyone who has to look at the photograph and see a date on it. A date held in a file travels separately from the picture; a date printed on the picture does not
- Open the photo and click Download or Share. Tick Stamp the date on the image and the date goes into the bottom-left corner of the copy that leaves BuildersAI
- You can add the project name and, where the photo carries one, the coordinates. You see exactly what the stamp will say before you download it
- The stamp says which date it is. It reads Captured where that is when the photograph was taken, and Added where all BuildersAI holds is when the photograph reached it, which is the case for many photos copied in from elsewhere. It never claims a photo was taken on a day we cannot support
- The time is the project’s, with the timezone named, so a photograph from a site in another country reads correctly wherever it is opened. The project’s timezone is in Project Settings
- Your photograph in BuildersAI is never changed. Only the copy going out carries the stamp, exactly as with drawings, so the stored picture is still the one the record rests on
- The answer is remembered between photos, so a set for an inspection is one decision rather than one per photo. For a whole folder at once, use an evidence pack with date-stamped copies
- A photo BuildersAI holds no date for is not offered the stamp, because there would be nothing true to print
- A date stamp and the How it was added record answer different questions. The stamp is for somebody glancing at a picture; the record and the evidence pack are for somebody who needs to know how we know
- On the phone, sharing a photo writes the date and location into the file rather than onto the picture. Printing it onto the image is in the browser
Who can do what:
- Admins and members can write a photo’s title and description, draw on it, pin points of interest and comment on it
- You can remove a shape you drew, and an admin can remove anybody’s. An admin can also clear every shape off a photo in one go
- Moving a shape or changing a label’s words is only for your own, and only until you put the pen down
- A point of interest can only be removed by the person who placed it
- Producing an evidence pack is for admins and members
- A follower cannot add or change anything in the Gallery, and sees only the photos and albums set to “Everyone”
- If the project’s subscription has lapsed the whole Gallery goes read-only for everybody, so nothing here can be added or changed. See the “photos” topic